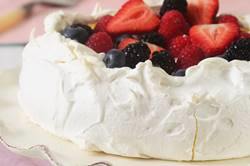
This week we have a very busy week of entertaining, or in some cases us been entertained. Due to where we live everyone tries to help out when it comes to a dinner party so this week I have been given the task off doing deserts. As most of the people hosting the dinner parties are American I thought I would take along a true Australian icon the Pavlova. I have never made a Pavlova before, so in some respects if not many I am crazy for going into uncharted waters, but what the heck. With this in mind I will be trying 3 versions and will share with you the fail safe result. So far I have one in the oven and it is looking nothing like the one my mum use to make.......
lets get started:
preheat oven to 250F (130C), place rack in the middle of the oven, on a piece of parchment draw a 18 inch circle turning your paper upside down place it on your baking tray - you should see the circle outline, this will be your guide for for the base of your Pavlova
ingredients for Pavlova base:
- 4 large eggs, whites only, VIP no yoke at all
- 1 cup super fine sugar (castor of confectionary sugar)
- 1/2 teaspoon pure vanilla extract
- 1 teaspoon white vinegar
- 1/2 tablespoon corn starch (corn flour)
ingredients for Pavlova filling:
- 1 cup heavy whipping cream
- 1 1/2 tablespoon granulated white sugar (or to taste)
- 1/2 teaspoon pure vanilla extract (optional)
- Fresh fruit - what ever you have in season - strawberries, kiwi fruit, passionfruit, raspberries etc
lets begin making our Pavlova:
- In a bowl place all the egg whites, using the whisk attachment of your electric beater, beat the egg white on medium speed until the have formed soft peaks.
- Start adding the sugar, a tablespoon at a time ensuring that the sugar is dissolved before adding next spoon, and continue to beat on high speed until the meringue holds very stiff and shiny peaks.
- (hint: test to see if the sugar is fully dissolved by rubbing a little meringue between your thumb and index finger, the meringue should feel smooth not gritty. if it feels gritty the sugar has not completely dissolved so you will need to keep beating until it feels smooth between your fingers)
- Beat in the vanilla extract.
- Spread the white vinegar and corn starch over the top of the meringue and, with a rubber spatula, gently fold in.
- Spread the meringue inside the circle drawn on the parchment paper, smoothing the edges of the meringue, making sure the edges of the meringue are slightly higher than the centre.
- (hint: you need a slight well in the centre of the meringue to place the whipped cream and fruit)
- Bake for 60 - 75 minutes or until the outside is dry and is a very pale cream colour.
- Turn the oven off, leave the door slightly ajar, and let the meringue cool completely in the oven.
- (hint: the outside of the meringue will feel firm to the touch, if gently pressed, buts as it cools you will get a little crackling and you will see that the inside is soft and marshmallowy)
- The cooled meringue can be made and stored in a cool dry place, in an air tight container, for a few days.
- Just before serving gently place meringue on a serving plate.
- For the topping / filling - whip the cream until soft peaks, sweeten with the sugar and vanilla to taste.
- Gently fold in 1/3 of the seasonal berries you are using into the cream, now place the cream in the well of your meringue.
- With the remaining berries / fruit arrange randomly on top of the cream.
- (hint - place cream on meringue just before serving, longer than this will begin to make the meringue soggy)
- Serve immediately.
This is my first try and as mentioned it really does not look as good as my mums, will be doing another one tomorrow, will see how that goes.....XXoo S
where is the picture of the one you did? Mmmm making me hungry!
ReplyDelete